If you've ever played keywiz on Emacs: "M-x keywiz", you were probably eating humble-hacker-pie by the end of the game. (For the uninitiated, keywiz is a game in emacs that's asks 10 random questions about key-bindings for some times obscure emacs commands.) So far my top score is 4 (out of 10).
So what is a novice to do? I've decided to write commands I want to learn on sticky notes on my monitor until I memorize them.
So, without further ado, here's this weeks list of new commands:
M-g g
goto line. This command will ask for a line number and take you there in the current file.
C-x v=
vc-diff. This command will show a diff between current file and HEAD in whatever Version Control System you are using.
C-x vv
vc-next-action. This command will perform the next appropriate VCS command, such as add current file to staging, or commit.
C-M-\
indent-region. If there is a defined region, this command will indent it.
C-M-;
comment-region. If there is a defined region, this command will comment the region out. (or uncomment a commented out region.)
A note: to define a region. Do a C-[spc] at the beginning of the region and then move to the end of the region however you'd like (arrow keys, C-n, C-f, C-v). If you can't see the regions add the following to your .emacs file: (transient-mark-mode 1).
Second note, in the above key combination, capital C, means hold the Ctrl key, capital M, means hold the Alt key. If there are dashes between letters: type them together (or with C or M hold the Ctrl or Alt key while typing the other key. So with M-g g: Hold Alt while typing g, let go and then type g again.)
Now off to work on a new version of keywiz, perhaps keywiz-jr!
Tuesday, December 28, 2010
Tuesday, December 21, 2010
Using Gnu Screen
I've been a long time user of Linux and the command line, but not until recently have I used the amazing program: screen. Screen is a terminal multiplexor. This means you can have multiple sessions open at the same time (even over a single ssh connection) and flip back and forth between them.
Prior to discovering screen I'd often be ssh'd into a remote server editing a file when the ssh session would time out or drop and I'd have to quickly open up a new terminal and start editing the file again. Now while using screen, the screen session itself is independent of the ssh session. So if my ssh connection flakes out, I start up a new terminal, ssh into the server, "reattach" the previous screen session to this new terminal and all of my work: my emacs window, my bash jobs, etc are still running in the screen session!
a: include all capabilities (with some minor exceptions) in each window's termcap
A: Adapt the sizes of all windows to the size of the current terminal
d: Forceably detach any sessions that are still holding on to this (your workstation at work for instance).
C-b C-b and so on... Another good thing to add to the screenrc is code for a modeline, so you can see the available windows:
Prior to discovering screen I'd often be ssh'd into a remote server editing a file when the ssh session would time out or drop and I'd have to quickly open up a new terminal and start editing the file again. Now while using screen, the screen session itself is independent of the ssh session. So if my ssh connection flakes out, I start up a new terminal, ssh into the server, "reattach" the previous screen session to this new terminal and all of my work: my emacs window, my bash jobs, etc are still running in the screen session!
How to start screen
bart@home: $ ssh boris@remote-server-in-distant-vladivostok

boris@distant-vlad: $ screen
If you already have a screen session running on the remote server you can reattach with:boris@distant-vlad: $ screen -r
I like to use the options: -raAd, mostly because it looks raad.boris@distant-vlad: $ screen -raAd
r: means reattach previous sessiona: include all capabilities (with some minor exceptions) in each window's termcap
A: Adapt the sizes of all windows to the size of the current terminal
d: Forceably detach any sessions that are still holding on to this (your workstation at work for instance).
Create new sessions
Once inside screen to start a new session use the keyboard combination: C-a c. That is, "Ctrl-a c". (the mnemonic is c for "create window") This will create a new window move you to it. To move back to the previous window, do a C-a C-a. You can also use the keyboard combos C-a n and C-a p to move to the Next and Previous windows. Or you can move to a window directly using its number with C-a 3 (or whatever number it is.)customizing screen with .screenrc
If you are an emacs user or if you use the emacs shortcuts on the command line, than you know that C-a is already used as the command to bring the cursor to the beginning of the line. So what to do? You can change the default keyboard bindings in the .screenrc configuration file in your home directory. If it doesn't already exist, create it and add the following line:escape ^Bb
or whatever you want to use as the control sequence. This will change the control sequence from C-a to C-b, other people use other keys, some use the backslash "\" instead. So now if you have changed to C-b, then to toggle between windows use:C-b C-b and so on... Another good thing to add to the screenrc is code for a modeline, so you can see the available windows:
caption string "%?%F%{= Bk}%? %C%A %D %d-%m-%Y %{= kB} %t%= %?%F%{= Bk}%:%{= wk}%? %n "

hardstatus alwayslastline

hardstatus string '%{= kG}[ %{G}%H %{g}][%= %{= kw}%?%-Lw%?%{r}(%{W}%n*%f%t%?(%u)%?%{r})%{w}%?%+Lw%?%?%= %{g}][%{B} %d/%m %{W}%c %{g}]'


This code will add a modeline to the bottom of the terminal that tells you which window you are in and also the numbers or names of the sessions.


Irssi is Screen's BFF
Best of all you can keep a session of Irssi (an irc client) running at all times in a screen session and always be up to date with your favorite IRC channels.


Additional Screen resources

Screen Quick Reference

Stayin' Alive with Screen

Power Sessions with Screen

Guide to Using Irssi with Screen
Thursday, July 29, 2010
Setting Up a Web Enabled Lending Library
Setting Up a Web Enabled Lending Library
I started cataloging books for a small community center's lending
library at librarything.com. Librarything.com is a great web site
that I highly recommend. If most of your books have ISBNs and you can
borrow someone's barcode scanner, cataloging books at Librarything is
a snap: on the "add books page" you scan a books ISBN and all of its
information (Title, Author, book cover) will be added by Librarything
for you. Of course if you don't have a bar code scanner or there is
no ISBN, you simply type in part of the title or author and select the
book from a list of possible matches, this is a bit slower, but
perfectly adequate if you are inputting a smaller library.
Once all of the books are added, the social networking goodness
begins! You're library has its own mini-site at Librarything, with a
publicly available catalog: Build Up Books catalog and profile:
Build Up Books profile. So for a community center, you can send out the URL, and anyone can search the catalog for books they find of interest.
The one problem with this system, is there isn't a robust system for
checking out books. Some libraries have adapted an informal system of
tagging books as "checked out" and in the private comments (only
visible to the administrator) added the borrowers contact
information. This is somewhat acceptable, but first: you would have
to give any volunteers access to all of your Librarything account's
permissions (you get all or nothing as far admin rights goes on
Librarything). Second there is no way to tell when the book was
checked out, when it is due back, and also no way to sort by which
books are currently overdue. So I thought I would look into importing
the library, once cataloged, into a drupal web site.
Exporting Library from Librarything
Librarything has excellent importing and exporting facilities. To
export, sign in to your account and then go to
http://librarything.com/more/import. On that page there are links for
downloading your catalog as either a comma separated csv file or a tab
delimited text file.
Downloading User Uploaded Book Covers
Librarything has over 1,000,000 user uploaded book covers, and it
makes them available for free. You need to a developer's key to
access them and there are some restrictions: you can only download
1000 per day and one per second. So with these understandable
restrictions, I decided it would be best to download the book covers
and store them locally. So yesterday I wrote a python script to
download all of the book covers for our library.
The Python Script
I will add a link at the bottom to the script on my
Github Repository. So the script I wrote searches through a
librarything csv file, finds all of the ISBNs and downloads the book
covers from Librarything.
import re, urllib, csv,time

CSV_FILE ='~/Downloads/LibraryThing_export.csv'
IMG_DIR ='~/img/'
DEV_KEY = 'YOUR_LIBRARYTHING_DEV_KEY'
IMG_URL = "http://covers.librarything.com/devkey/" + DEV_KEY + "/large/isbn/"
I use 4 python libraries.
- Re: for regular expressions to search for isbns.
- urllib: for downloading the Book Cover from Librarything
- csv: for creating a map data structure from a parsed csv file.
- time: for limiting the downloads to one per second.
Also I add a couple of variables. The important one to change is
DEV_KEY which contains your librarything developers key. Also make
sure the CSV_FILE points at your downloaded CSV_FILE and the IMG_DIR
exists. Finally IMG_URL points to the web service on librarything
where you can download user submitted book covers, all you need to do
is slap an ISBN on the end of that URL and the URL will return either
a book cover, or a clear 1x1 gif if they do not have that cover.
# read in the Librarything Export File
lt_dict = csv.DictReader(open(CSV_FILE))
#loop through the rows of the dictionary
for row in lt_dict:
    # grab the ISBN dictionary field
    mystr = row["'ISBN'"]
    # search for a matching ISBN
    mymatch = re.match(r"\[(\d+)\]",mystr)
    # if no match, print the title to STDOUT
    if mymatch is None:
        print "blank isbn for: %s" % row["'TITLE'"]
    else:
        # grab the matching string, this is our ISBN!
        isbn = mymatch.group(1)
        # build the web service request URL
        myurl = IMG_URL + isbn
        # where we will store the downloaded Book cover image
        myfile = "%slarge_%s" % (IMG_DIR,isbn)
        # urlretrieve downloads the image and stores it locally
        urllib.urlretrieve(myurl,myfile)
        print "myurl: %s, myfile: %s" % (myurl,myfile)
        # sleep for 2 seconds
        time.sleep(2)
The hard work is done by csv.DictReader and urllib.urlretrieve.
DictReader takes a csv file, parses the first line of the file for
field names and creates a dictionary data type, so you can loop
through the rows and have access to the fields by name. Urlretrieve,
takes a URL and an optional file name and it grabs the file at the URL
and stores it locally as the filename you provided.
In a later blog post I will describe the Drupal end of this project:
creating a book CCK content type, importing data into Drupal custom
content types, and setting up the check out process.
Thursday, May 13, 2010
Nook 1.2 emulator
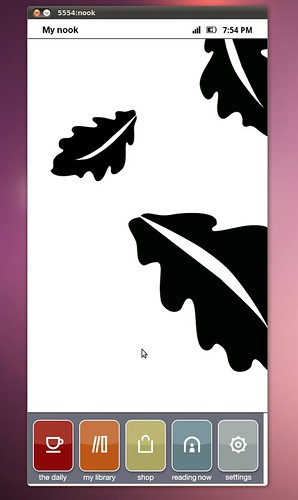 I was able to build an emulator for Nook version 1.2. See my previous post for the prerequisites. Basically you need some utilities installed: smali, baksmali, unyaffs, and mkyaffs2image. You also need the Android SDK installed on your computer.
Here are the steps:
1: download the nook 1.2 soft-root image from nookdevs. For the rest of this post I assume you have copied it into the directory ~/nook_dev/ and we will be working on it from there.
2. extract the bravo_update.dat, cd into it and extract root.tgz
I was able to build an emulator for Nook version 1.2. See my previous post for the prerequisites. Basically you need some utilities installed: smali, baksmali, unyaffs, and mkyaffs2image. You also need the Android SDK installed on your computer.
Here are the steps:
1: download the nook 1.2 soft-root image from nookdevs. For the rest of this post I assume you have copied it into the directory ~/nook_dev/ and we will be working on it from there.
2. extract the bravo_update.dat, cd into it and extract root.tgz
mv bravo_update.dat bravo_update-1.2.tar.gz
tar xvzf bravo_update-1.2.tar.gz
3. extract root.tgz
cd Firmware_Update
tar xvzf root.tgz
cd root
4. cd into system/framework and unjar services.jar
cd system/framework/
jar xvf services.jar
5. disassemble the classes.dex file inside services.jar
baksmali classes.dex6. vi out/com/android/server/ServerThread.smali search for a line that contains
if-lt v0, v1, :cond_309delete that line. 7. reassemble out/ directory
smali out/8. copy the new out.dex over the old classes.dex and re-jar services.jar
mv out.dex classes.dex
jar cvf services.jar classes.dex
Now we are going to build an android AVD, so we can extract a single file to use back in this system.
9. if your android SDK tools are in your path Run,androidelse find the android command and run it, or run it from eclipse. This starts the Android SDK and AVD Manager. To create a new AVD, click New... Name: nook Target: Android 1.5 Size:
cd ~/nook_dev/
mkdir sys_img
cd sys_img
cp ~/android-sdk-linux_86/platforms/android-3/images/system.img .
unyaffs system.img
cp lib/libaudioflinger.so ~/nook_dev/Firmware_Update/Firmware_Update/system/lib/libaudioflinger.so
11. re-create the system.img with the new audio file.
cd ~/nook_dev/Firmware_Update/Firmware_Update/
mkyaffs2image ./system/ system.img
this creates a new system.img 12. Sketchy step where you overwrite the good Android 1.5 platform system.img in your Android SDK with this new one.
mv ~/android-sdk-linux_86/platforms/android-3/images/system.img ~/android-sdk-linux_86/platforms/android-3/images/good.img
cp ~/nook_dev/Firmware_Update/Firmware_Update/system.img ~/android-sdk-linux_86/platforms/android-3/images/system.img
Remember to change this back later if you want to do non-nook related Android Development. 13. run the emulator!
emulator @nook -shell -show-kernel -verbose
Saturday, May 8, 2010
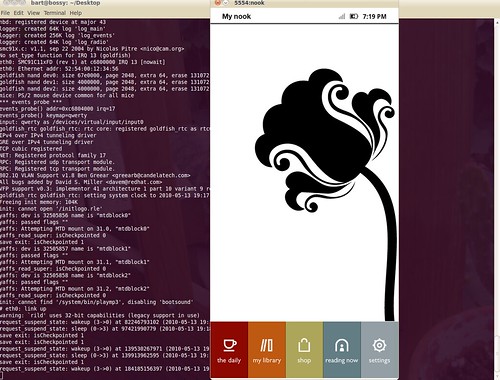
How to Build a Nook emulator
This post will walk you through building an Android Emulator for the Nook step-by-step in Eclipse and via the command-line. These instructions are based on the original instructions located at the nookdevs website.
1. You need to have Eclipse running with the Android SDK. More information on that can be found here.
2. I'm assuming you are developing in a Linux-ish environment. I'm using the amazing Ubuntu Lucid Lynx.
3. download and set up the following tools: smali, baksmali, unyaffs, yaffs2image.
smali and baksmali. Description from the developer's site:
"smali/baksmali is an assembler/disassembler for the dex format used by dalvik, Android's Java VM implementation".
1. Download them into your ~/bin/ directory.
2. "chmod +x" the wrapper scripts (smali and baksmali)
3. rename the jar files: smali.jar and baksmali.jar.
unyaffs description: Unyaffs is a program to extract files from a yaffs file system image.
1. download unyaffs into your
~/bin; chmod +x unyaffs;
mkyaffs2image:
1. download mkyaffs2image. I downloaded the yaffs2-binary.tar, untarred it and copied yaffs2/utils/mkyaffs2image to my ~/bin/ and chmod +x it.
1. I'm assuming you already have Eclipse set up and running with the Android Development Kit. Nook runs on the cupcake 1.5 platform of Android. So first we have to make sure that the Android 1.5 Platform is installed. Assuming you downloaded the Android SDK into your home directory, run:
This will start the Android SDK and AVD Manager. Click on Installed Packages and look for SDK Platform 1.5. If you do not see it, click on Available Packages and download and install it.
2. Grab the original 1.0.0 image from bn.com (mirrored here: multiupload).
3.Run
This takes a while. You now have signed-bravo-update.1.0.0.tar.gz
4.Uncompress the new file: signed-bravo-update.1.0.0.tar.gz
Now you have the uncompressed folder Firmware_Update,
5. Rename bravo_update.dat to bravo_update.tar.gz and extract it.
This uncompresses another Firmware_Update folder, cd in to it.
if you pwd, you'll be in Firmware_Update/Firmware_Update
6. Extract root.tgz
this uncompresses a lot of stuff. All of the Android system image actually. Later we will re-compress the system folder to create the system.img
7. Extract system/framework/services.jar with your favorite unzip utility.
I did this from the GUI, right click on file and select "Extract here".
$ cd services
8. disassemble the file classes.dex with baksmai
This create out/
9. vi out/com/android/server/ServerThread.smali
delete the line
(for the vi-newbies, you can search in vi by typing a forward slash and typing in a phrase like "if\-lt", then type dd, to delete the line, and ":wq" to write the file and quit)
10. reassemble the file with
11. Replace the old classes.dex with this re-assembled file:
12. delete the old out/ directory and re-jar the contents of the services folder, but the not the services folder itself.
(I moved the META-INF folder and classes.dex out of the services directory and into the parent framework directory. Removed the empty services directory. Right clicked the classes.dex and selected "compress", and selected as name "services" and type as "jar" file, then I dragged the META-INF file onto the new services.jar. Yes, I know there is a better way, but I'm kind of new to jar files...)
13. if your android SDK tools are in your path Run,
else find the android command and run it, or run it from eclipse.
This starts the Android SDK and AVD Manager. To create a new AVD, click New...
Name: nook
Target: Android 1.5
Size:
Skin: click Resolution, and fill in 488 x 944
click "Create AVD".
Then click "Details" to see where it was created. It should be at ~/.android/avd/nook.avd
14. unyaffs the system.img and grab a file
15. re-create the system.img with the new audio file.
this creates a new system.img
16. Sketchy step where you overwrite the good Android 1.5 platform system.img in your Android SDK with this new one.
Remember to change this back later if you want to do non-nook related Android Development.
17. run the emulator!
Pre-requisites:
1. You need to have Eclipse running with the Android SDK. More information on that can be found here.
2. I'm assuming you are developing in a Linux-ish environment. I'm using the amazing Ubuntu Lucid Lynx.
3. download and set up the following tools: smali, baksmali, unyaffs, yaffs2image.
How I Set Up the command-line tools:
smali and baksmali. Description from the developer's site:
"smali/baksmali is an assembler/disassembler for the dex format used by dalvik, Android's Java VM implementation".
1. Download them into your ~/bin/ directory.
2. "chmod +x" the wrapper scripts (smali and baksmali)
3. rename the jar files: smali.jar and baksmali.jar.
cd ~/bin/
wget http://smali.googlecode.com/files/smali-1.2.2.jar
wget http://smali.googlecode.com/files/baksmali-1.2.2.jar
wget http://smali.googlecode.com/files/baksmali
wget http://smali.googlecode.com/files/smali
mv baksmali-1.2.2.jar baksmali.jar
mv smali-1.2.2.jar smali.jar
chmod +x smali
chmod +x baksmali
unyaffs description: Unyaffs is a program to extract files from a yaffs file system image.
1. download unyaffs into your
~/bin; chmod +x unyaffs;
mkyaffs2image:
1. download mkyaffs2image. I downloaded the yaffs2-binary.tar, untarred it and copied yaffs2/utils/mkyaffs2image to my ~/bin/ and chmod +x it.
Okay we have the tools and our environment is ready!
1. I'm assuming you already have Eclipse set up and running with the Android Development Kit. Nook runs on the cupcake 1.5 platform of Android. So first we have to make sure that the Android 1.5 Platform is installed. Assuming you downloaded the Android SDK into your home directory, run:
$ ~/android-sdk-linux_86/tools/android
This will start the Android SDK and AVD Manager. Click on Installed Packages and look for SDK Platform 1.5. If you do not see it, click on Available Packages and download and install it.
2. Grab the original 1.0.0 image from bn.com (mirrored here: multiupload).
3.Run
$ dd if=signed_bravo_update.1.0.0.dat of=signed-bravo-update.1.0.0.tar.gz bs=1 skip=152
This takes a while. You now have signed-bravo-update.1.0.0.tar.gz
4.Uncompress the new file: signed-bravo-update.1.0.0.tar.gz
$ tar xzvf signed-bravo-update.1.0.0.tar.gzNow you have the uncompressed folder Firmware_Update,
$ cd Firmware_Update5. Rename bravo_update.dat to bravo_update.tar.gz and extract it.
$ mv bravo_update.dat bravo_update.tar.gz
$ tar xvzf bravo_update.tar.gz
This uncompresses another Firmware_Update folder, cd in to it.
$ cd Firmware_Updateif you pwd, you'll be in Firmware_Update/Firmware_Update
6. Extract root.tgz
$ tar xvzf root.tgz
this uncompresses a lot of stuff. All of the Android system image actually. Later we will re-compress the system folder to create the system.img
7. Extract system/framework/services.jar with your favorite unzip utility.
I did this from the GUI, right click on file and select "Extract here".
$ cd services
8. disassemble the file classes.dex with baksmai
$ baksmali classes.dex9. vi out/com/android/server/ServerThread.smali
delete the line
if-lt v0, v1, :cond_483(for the vi-newbies, you can search in vi by typing a forward slash and typing in a phrase like "if\-lt", then type dd, to delete the line, and ":wq" to write the file and quit)
10. reassemble the file with
$ smali out11. Replace the old classes.dex with this re-assembled file:
mv out.dex classes.dex12. delete the old out/ directory and re-jar the contents of the services folder, but the not the services folder itself.
(I moved the META-INF folder and classes.dex out of the services directory and into the parent framework directory. Removed the empty services directory. Right clicked the classes.dex and selected "compress", and selected as name "services" and type as "jar" file, then I dragged the META-INF file onto the new services.jar. Yes, I know there is a better way, but I'm kind of new to jar files...)
Now we are going to build an android AVD, so we can extract a single file to use back in this system.
13. if your android SDK tools are in your path Run,
android
else find the android command and run it, or run it from eclipse.
This starts the Android SDK and AVD Manager. To create a new AVD, click New...
Name: nook
Target: Android 1.5
Size:
Skin: click Resolution, and fill in 488 x 944
click "Create AVD".
Then click "Details" to see where it was created. It should be at ~/.android/avd/nook.avd
14. unyaffs the system.img and grab a file
cd ~/nook_dev/
mkdir sys_img
cd sys_img
cp ~/android-sdk-linux_86/platforms/android-3/images/system.img .
unyaffs system.img
cp lib/libaudioflinger.so ~/nook_dev/Firmware_Update/Firmware_Update/system/lib/libaudioflinger.so
15. re-create the system.img with the new audio file.
cd ~/nook_dev/Firmware_Update/Firmware_Update/
mkyaffs2image ./system/ system.img
16. Sketchy step where you overwrite the good Android 1.5 platform system.img in your Android SDK with this new one.
mv ~/android-sdk-linux_86/platforms/android-3/images/system.img ~/android-sdk-linux_86/platforms/android-3/images/good.img
cp ~/nook_dev/Firmware_Update/Firmware_Update/system.img ~/android-sdk-linux_86/platforms/android-3/images/system.img
Remember to change this back later if you want to do non-nook related Android Development.
17. run the emulator!
emulator @nook -shell -show-kernel -verbose
Tuesday, May 4, 2010
Moving with Eclipse to a new workstation
The hard drive on my laptop started clicking quite ominously, so I figured it was time to order a new hard drive. I backed up my photos to the cloud (Flickr and Picasa) and backed up all my music and docs to Dropbox and Google Docs and waited for the new hard drive to arrive. Files are files: you just need to keep a regular backup; and email already lives in the cloud. That leaves my development environment.
Here are the steps I've followed to move my development set up to a new computer.
1. open up Synaptic and download Eclipse. There are several Eclipse packages available. I selected the big Eclipse package which includes the JDT (Java Developer Tools) and PDE (plug-in development tools). I've had trouble before when I selected one of the smaller eclipse packages and tried to add the plug-ins I needed separately.
2. Download or copy over the Android SDK.
3. Put the Android SDK tools directory in my PATH in .bashrc
b. then type 'bash', so the new .bashrc takes effect.
c. type 'adb', to make sure the android SDK tools are in my PATH.
4. open up Eclipse and go to Help->Install New Software... click "add" to add a new tools depository, and add the android developer tools repository: https://dl-ssl.google.com/android/eclipse/.
b. once the new depository is loaded, select the Android Developer Tools and Android DDMS and wait for Eclipse to download and install them.
5. moved my private signing key over.
6. moved over my projects and imported them through File->Import... ->Existing Projects into Workspace.
b. if you get any errors, try right clicking on the project and select Android Tools->Fix Project Properties
7. Export an app and sign it with the key you moved over. (this is the scary part, if you lose the signing key you used to originally sign your app, you will not be able to provide any more updates to your app in the Android Market!)
a. File->Export ... Android->Export Android Application --> select the project you want to Export --> Use existing keystore, (click location to locate it.) type in your password....
8. Plug your dev phone into your workstation and install the app.
a. adb install -r /path/to/YourApp.apk
Whoo Hoo! The development environment (for android at least) is all moved over.
Thursday, April 29, 2010
Phone update update: Wow, that was fast
I just updated my G1/dream to CyanogenMod-4.2.15.1 with danger spl. The actual flashing of the 3 different roms (danger-spl, defanged base, cm-4.2.15.1) part only took about 20 minutes. This was after I had already downloaded all of the necessary files, copied them to the SD card and verified my radio version (Settings->About phone->Baseband version).
The first time you root your phone it will take a bit longer than this. One of the reasons it is much faster after the first time, is because during the initial rooting process, you load a "recovery utility" that you will use later.
Now to wait for CyanogenMod-5.0.7 to drop.
So how do I know if the Danger SPL is loaded? (via this cyanogenmod forum post)
1. Turn off phone.
2. Hold the camera button on the side and press the red power button. If you are using Danger SPL, you'll see a white screen with 3 androids riding skateboards. At the top of the screen you'll see the text:
HBOOT-1.33.2005
like this:
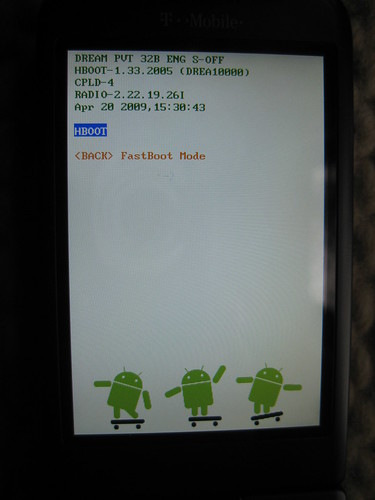
Updating my android g1 phone to cyanogen 4.2.15.1 with Danger SPL
Tonight cyanogen is releasing 5.0.7 of the cyanogenmod. This is a modified ROM for android phones, that will finally allow g1 phone users like myself to run most of the latest android apps on our phones. It will add most of the Android Eclair functionality to older android phones, except for Live Wallpapers, but I didn't really see myself using any live wallpapers anyway.
The one catch is that the new ROM is too big to fit inside the G1's tiny internal memory. The G1 has 64 MB of room for ROMs, and according to Cyanogen no matter how he tried to squeeze the ROM 64 MB was still 4 MB too small. So in order to load the new ROM with the eclair goodies, you need to use an SPL (second program loader), to load the ROM. More info on the Danger SPL.
So in anticipation of tonight's release, I am installing the Danger SPL on my phone. The danger spl how to at cyanogenmod.com says that the pre-requisites are a rooted G1/Dream phone (check) and a compatible radio, with links to the radio images. So I downloaded the radios, but nowhere in the rest of the article did it mention what to do with the radio images. I was worried, but then I realized you just need to have one of the radios currently on your phone or you need to install one of the images I downloaded. After searching the interweb for how to check which radio is installed on your phone, I found this article, which says look in your phone under: Settings->About Phone->Baseband version, the last part of the number is your radio version. In my case its 2.22.19.26I, which is compatible!
So on to updating the ROM!
Monday, April 26, 2010
Drupal 7: What you need to know
This is the video that inspired me to download and test Drupal 7. Good, informative video!
Test several websites on your computer at once
After watching several videos from last week's DrupalCon I had an itch to try out Drupal 7 for myself. The problem was I already had a site I was testing on my laptop. I could've downloaded it to my test server, but I've been testing alot lately at coffee shops with spotty wifi, so I decided I'd add some entries to my hosts file instead and write up a quick How-to.
(pre-requisites: You must have apache, php and mysql already running on your workstation. On ubuntu this is as simple as opening synaptic and searching for each of these packages and installing them: apache2, php5, mysql.)
Multiple development websites in 3 steps.
1. Edit your hosts file. On Linux this is located at /etc/hosts. On Windows machines (XP, Vista, Windows 7) it is located at %SystemRoot%\system32\drivers\etc\hosts. On Mac OS X, its located in: /private/etc/hosts add a new entry for each website you want to test (don't worry you can add more later): 127.0.0.1 d7 127.0.0.1 d6 in this case I added two entries: one to test drupal 6, and a second to test drupal 7. To check that everything is working, open up a teriminal and ping d7 you should see something like this:2. Edit your Apache config file Add a <VirtualHost> entry for each of the test sites:$ ping d7 PING d7 (127.0.0.1) 56(84) bytes of data. 64 bytes from localhost (127.0.0.1): icmp_seq=1 ttl=64 time=0.044 ms 64 bytes from localhost (127.0.0.1): icmp_seq=2 ttl=64 time=0.047 ms 64 bytes from localhost (127.0.0.1): icmp_seq=3 ttl=64 time=0.051 ms 64 bytes from localhost (127.0.0.1): icmp_seq=4 ttl=64 time=0.055 ms
<VirtualHost *:80>
    ServerName d7
    DocumentRoot /home/bart/Public/drupal-7.x-dev
</VirtualHost>
<VirtualHost *:80>
    ServerName d6
    DocumentRoot /home/bart/Public/drupal-6.16
</VirtualHost>
3. restart apache
$sudo apache2ctl restartNow you're ready to test the websites by opening up the URLs: http://d7 and http://d6 in a browser. As a bonus: go check out the DrupalCon2010 screencasts at archive.org.
Wednesday, April 21, 2010
Non-destructibly upgrade your android app's database
So your android app is out in the wild with thousands of Happy Users and the Happy Users are begging and pleading for a new feature that requires a new field in your database. However, the aforementioned Happy Users, would quickly turn to Unhappy Users if your next upgrade wiped their data when it restructured the app's database.
What to do?
Here's how I upgraded my app's Database schema, while preserving all of the user's data.
First of all, I use a DatabaseHelper class (that extends SQLiteOpenHelper) that performs some of the basic database needs (create, upgrade).
The function we will concentrate on in this post is onUpgrade(). This function is called when the database version, represent with the constant DATABASE_VERSION is changed. Most barebones implementation of this function call will simply drop the app's tables and recreate them with a call to onCreate():
public void onUpgrade(SQLiteDatabase db, int oldVersion, int newVersion) {
    ...
    db.execSQL("DROP TABLE IF EXISTS albums");
    onCreate(db);
}
However, this approach will destroy all of your user's data, (ie the entire 2500+ CD collection they painstakingly entered with the soft keybard--if this were the case perhaps you should add a barcode scanner intent, alas, back to the story.) Which results in a Very Unhappy User (hereafter VUU).
The solution, is to check for the app's Database Version and make a call to our friend ALTER TABLE, like so.
public void onUpgrade(SQLiteDatabase db, int oldVersion, int newVersion) {
   if(oldVersion == 2) {
          db.execSQL("ALTER TABLE albums ADD COLUMN hip_again integer");
   } else {
         ...
        db.execSQL("DROP TABLE IF EXISTS albums");
        onCreate(db);
  }
}
There! Now your user's can flag their old CD's with the shifting tides of what's hip. Also note that should add the column in the onCreate method. So that Happy Users of the Future (hereafter HUF), will also have the field available to them:
private static final String DATABASE_CREATE =
          "create table albums (_id integer primary key autoincrement, "
          ...
          + "hip_again integer);";

@Override
public void onCreate(SQLiteDatabase db) {
                 db.execSQL(DATABASE_CREATE);
}
One final thing is to increment the constant DATABASE_VERSION, so that android will call onUpgrade() the next time the app is started:
private static final int DATABASE_VERSION = 3;That's it.
Subscribe to:
Posts (Atom)