Thursday, April 29, 2010
Phone update update: Wow, that was fast
I just updated my G1/dream to CyanogenMod-4.2.15.1 with danger spl. The actual flashing of the 3 different roms (danger-spl, defanged base, cm-4.2.15.1) part only took about 20 minutes. This was after I had already downloaded all of the necessary files, copied them to the SD card and verified my radio version (Settings->About phone->Baseband version).
The first time you root your phone it will take a bit longer than this. One of the reasons it is much faster after the first time, is because during the initial rooting process, you load a "recovery utility" that you will use later.
Now to wait for CyanogenMod-5.0.7 to drop.
So how do I know if the Danger SPL is loaded? (via this cyanogenmod forum post)
1. Turn off phone.
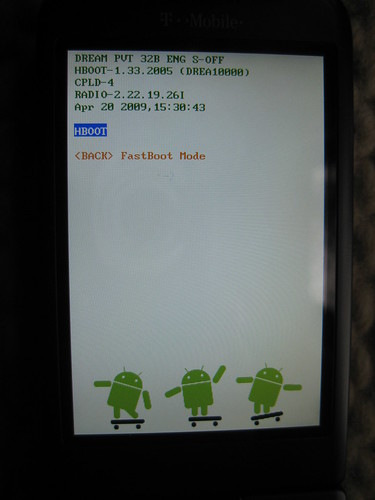
2. Hold the camera button on the side and press the red power button. If you are using Danger SPL, you'll see a white screen with 3 androids riding skateboards. At the top of the screen you'll see the text:
HBOOT-1.33.2005
like this:
Updating my android g1 phone to cyanogen 4.2.15.1 with Danger SPL
Tonight cyanogen is releasing 5.0.7 of the cyanogenmod. This is a modified ROM for android phones, that will finally allow g1 phone users like myself to run most of the latest android apps on our phones. It will add most of the Android Eclair functionality to older android phones, except for Live Wallpapers, but I didn't really see myself using any live wallpapers anyway.
The one catch is that the new ROM is too big to fit inside the G1's tiny internal memory. The G1 has 64 MB of room for ROMs, and according to Cyanogen no matter how he tried to squeeze the ROM 64 MB was still 4 MB too small. So in order to load the new ROM with the eclair goodies, you need to use an SPL (second program loader), to load the ROM. More info on the Danger SPL.
So in anticipation of tonight's release, I am installing the Danger SPL on my phone. The danger spl how to at cyanogenmod.com says that the pre-requisites are a rooted G1/Dream phone (check) and a compatible radio, with links to the radio images. So I downloaded the radios, but nowhere in the rest of the article did it mention what to do with the radio images. I was worried, but then I realized you just need to have one of the radios currently on your phone or you need to install one of the images I downloaded. After searching the interweb for how to check which radio is installed on your phone, I found this article, which says look in your phone under: Settings->About Phone->Baseband version, the last part of the number is your radio version. In my case its 2.22.19.26I, which is compatible!
So on to updating the ROM!
Monday, April 26, 2010
Drupal 7: What you need to know
This is the video that inspired me to download and test Drupal 7. Good, informative video!
Test several websites on your computer at once
After watching several videos from last week's DrupalCon I had an itch to try out Drupal 7 for myself. The problem was I already had a site I was testing on my laptop. I could've downloaded it to my test server, but I've been testing alot lately at coffee shops with spotty wifi, so I decided I'd add some entries to my hosts file instead and write up a quick How-to.
(pre-requisites: You must have apache, php and mysql already running on your workstation. On ubuntu this is as simple as opening synaptic and searching for each of these packages and installing them: apache2, php5, mysql.)
Multiple development websites in 3 steps.
1. Edit your hosts file. On Linux this is located at /etc/hosts. On Windows machines (XP, Vista, Windows 7) it is located at %SystemRoot%\system32\drivers\etc\hosts. On Mac OS X, its located in: /private/etc/hosts add a new entry for each website you want to test (don't worry you can add more later): 127.0.0.1 d7 127.0.0.1 d6 in this case I added two entries: one to test drupal 6, and a second to test drupal 7. To check that everything is working, open up a teriminal and ping d7 you should see something like this:2. Edit your Apache config file Add a <VirtualHost> entry for each of the test sites:$ ping d7 PING d7 (127.0.0.1) 56(84) bytes of data. 64 bytes from localhost (127.0.0.1): icmp_seq=1 ttl=64 time=0.044 ms 64 bytes from localhost (127.0.0.1): icmp_seq=2 ttl=64 time=0.047 ms 64 bytes from localhost (127.0.0.1): icmp_seq=3 ttl=64 time=0.051 ms 64 bytes from localhost (127.0.0.1): icmp_seq=4 ttl=64 time=0.055 ms
<VirtualHost *:80>
    ServerName d7
    DocumentRoot /home/bart/Public/drupal-7.x-dev
</VirtualHost>
<VirtualHost *:80>
    ServerName d6
    DocumentRoot /home/bart/Public/drupal-6.16
</VirtualHost>
3. restart apache
$sudo apache2ctl restartNow you're ready to test the websites by opening up the URLs: http://d7 and http://d6 in a browser. As a bonus: go check out the DrupalCon2010 screencasts at archive.org.
Wednesday, April 21, 2010
Non-destructibly upgrade your android app's database
So your android app is out in the wild with thousands of Happy Users and the Happy Users are begging and pleading for a new feature that requires a new field in your database. However, the aforementioned Happy Users, would quickly turn to Unhappy Users if your next upgrade wiped their data when it restructured the app's database.
What to do?
Here's how I upgraded my app's Database schema, while preserving all of the user's data.
First of all, I use a DatabaseHelper class (that extends SQLiteOpenHelper) that performs some of the basic database needs (create, upgrade).
The function we will concentrate on in this post is onUpgrade(). This function is called when the database version, represent with the constant DATABASE_VERSION is changed. Most barebones implementation of this function call will simply drop the app's tables and recreate them with a call to onCreate():
public void onUpgrade(SQLiteDatabase db, int oldVersion, int newVersion) {
    ...
    db.execSQL("DROP TABLE IF EXISTS albums");
    onCreate(db);
}
However, this approach will destroy all of your user's data, (ie the entire 2500+ CD collection they painstakingly entered with the soft keybard--if this were the case perhaps you should add a barcode scanner intent, alas, back to the story.) Which results in a Very Unhappy User (hereafter VUU).
The solution, is to check for the app's Database Version and make a call to our friend ALTER TABLE, like so.
public void onUpgrade(SQLiteDatabase db, int oldVersion, int newVersion) {
   if(oldVersion == 2) {
          db.execSQL("ALTER TABLE albums ADD COLUMN hip_again integer");
   } else {
         ...
        db.execSQL("DROP TABLE IF EXISTS albums");
        onCreate(db);
  }
}
There! Now your user's can flag their old CD's with the shifting tides of what's hip. Also note that should add the column in the onCreate method. So that Happy Users of the Future (hereafter HUF), will also have the field available to them:
private static final String DATABASE_CREATE =
          "create table albums (_id integer primary key autoincrement, "
          ...
          + "hip_again integer);";

@Override
public void onCreate(SQLiteDatabase db) {
                 db.execSQL(DATABASE_CREATE);
}
One final thing is to increment the constant DATABASE_VERSION, so that android will call onUpgrade() the next time the app is started:
private static final int DATABASE_VERSION = 3;That's it.
Subscribe to:
Posts (Atom)